daddy made it

Turning fatherhood into art (and crafts). To inspire parents to turn their kids' childhood into works of art.

Thursday, August 02, 2007

About to Go Way Out on a Limb

This is what I'm thinking. And I know I've gone mad. Absolutely bonkers.

I'm finally having the back yard redone. New fence? Check. Landscaping, almost done. I'm thinking I need a dry river of pebbles. And a little Japanese bridge over that. Then it hits me. This urge. This need that I didn't even know I had...

I want, I need to build a treehouse. My God! Really??! For Little E. or me? She will love it, of course. But.

With a small child and another on the way, is this the best use of money and time?

But.

It might be too late. I'm already two treehouse books in (The Treehouse Book, Treehouses (The House That Jack Built Series)). I've got a third. I've started looking at the lone, big tree in the back, lovingly, imagining the possibilities.

I really don't know if a grown man should look at a tree like I'm been looking at that tree. Perhaps only another man with kids will understand.

I am motivated. Inspired. Is this the way back to my childhood? The one I never really had?

Stay tuned.

Monday, February 26, 2007

Carnival of Family Life

Be sure of catch the latest addition of the Carnival of Family Life hosted by Modern Sage.

Friday, February 23, 2007

If You Make E. a Gingerbread Baby T-shirt...

It started just before Christmas. It started with Jan Brett's book Gingerbread Baby. Little E. loves the book. Practically memorized the entire thing. I kid you not. So I made her a t-shirt. I used the same iron-on process as the previous tee.

What I did.
1. I scanned the cover of the book for the artwork. Lifted the Gingerbread Baby and the text.
2. Printed it out on the iron on paper.
3. Ironed it on a blank tee. And Voila!

Total cost: $0 (I had all the materials on hand).

Of course, now she wants a Gingerbread house. After searching high and low online, the wife found Jan Brett's own website which had a little project showing you how to make your own cardboard house.

I followed the instructions and here's how it turned out.

What I did.
1. Printed the sides, in color, on an Avery labels.
2. Stuck it on cardboard.
3. Cut the cardboard and glued it together to make the house.

But...

If you make little E. a Gingerbread house, she's going to ask for a Gingerbread Baby. Silly me. Why didn't I think this through before I started on all of this?


Using the same technique as the house, I made a Gingerbread Baby that E. can play with. I had to use a clip thingy to make it stand by itself.

That's it. Never again.

Monday, November 20, 2006

Monkey Pie Stays in the T-Shirt


Little E.'s soft toy, Monkey Pie, has become my muse, according to the wife. She may be right.

T-shirt #2, Iron on Transfer #1.

Where I Got the Design: While surfing online, I discovered this print by Jamfancy. Check out the original here. The little girl in the picture had a passing resemblance to Little E. But in the original picture, she is hugging a teddy bear. So...

What I Did: Photoshopped Monkey Pie into the picture and printed it onto Iron On transfer paper, then ironed it on to her shirt.

Cost: $3 for the shirt, $1.20 for the paper.

The Look on Little E.'s Face When She Saw Her Shirt: Priceless.

Downside: Maybe I didn't print it properly or it's a cheapo paper, but it's not holding up very well. After a couple of washings, parts of the design are peeling.

Thursday, October 19, 2006

E. Provides the Soundtrack for this Video

So I made this video short.

Occasion: No occasion. Just wanted to try out this stop-motion video short tutorial I read in Photomojo. Also, I wanted to preserve some audio we have of Little E. singing.

Inspired by: Little E. playing with all her toys, lining them up like a train.

Difficulty: Med/Hard.

Click here to view the full video.

Haring Screen T-Shirt

This is a t-shirt I made for the wife. It is a Keith Haring design of a Man and Woman Holding Up a Child in Celebration.

Occasion: Wife's birthday.

Where I got the Idea: From this tutorial here. Basically, the steps are:
  1. Get a design.
  2. On a embroidery hoop, copy design onto the hoop with pencil.
  3. Paint the negative (white) space with glue.
  4. Lay it over the shirt, paint over the lines (black) space with Black fabric paint.
  5. After it dries, iron to seal it.
Definitely check out the tutorial for detailed instructions.

Difficulty: Easy/Medium.

Time: Can be done in a weekend or less, if you're organized and can gather all the materials beforehand.

Cost: $10-$15. The shirt was free.

Post-Mortem: It definitely didn't come out as clear as I wanted. Some of the lines are jagged. Maybe I used the wrong kind of mesh. Anyway, for my first effort, not too bad.

My next attempt will be a Stencil Screen Method. Stay tuned.

Wednesday, September 06, 2006

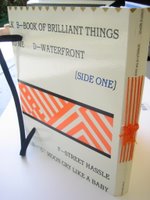
Turn an Old Record Cover into a Snazzy Notebook

Aka. Making a 100-page "book of brilliant things."

Confession time: I have an embarrassing weakness for ... stationary. There, I said it. We're talking pens, staplers, notebooks, paper, paperweights, whatever one can find in a stationary. It's not unlike my relationship to cameras (I have about 10, and still coveting more).

But lately, what I've been coveting are things you can't buy in a store. More and more, I'm finding things on the web that I want to make. That I have to make. Not just for me, but for the wife and kid.

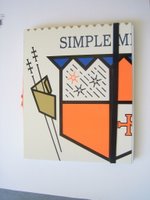
So when I saw this tutorial on turning those old vinyl record covers into a journal notebook, I had to try it. That's my first effort on the left, using a Simple Minds cover.


Who it was made for: The wife.
The occasion: None. Just wanted to make it.

Materials:
  • Paper. Legal size.
  • Old album cover
  • Yarn and embroidery needle
  • Thumb tacks.
  • Paper Cutter
  • Binder clips
  • Pencil
  • Ruler
  • Butter knife
  • Elastic

Check out the Instructable link for the full tutorial with photos, but basically:
  1. Measure and cut album cover.
  2. Fold the paper.
  3. Clip to hold together. Puncture holes.
  4. Stitch the binding.
  5. Put on the elastic.
Ta Da.

Total time: about 2 hours (you could do it quicker, if you're the organized type.)

Total cost: $1.50 (for the elastic).

What I could do better: The stitchings are a little loose. I could try to make them tighter next time.

Tuesday, September 05, 2006

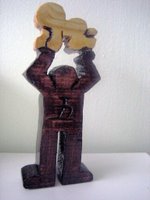
Make a Wooden Mini-Haring Statue

What got into me? What made me do this? Well, my fifth wedding anniversary (traditional gift: Wood) was fast approaching and I was out of ideas. I'm a big, big fan of Keith Haring. I have a little girl. And because I wanted to give my wife something special, different and romantic (see my post on 4 Ways to More Romance) to decorate her new office.

What I did
1. I went to the Haring site and found the design for the Man Lifting Child Aloft (my title not his).

Copyright disclosure: The copyright, the licensing, the whole intellectual caboodle belongs to Keith Haring and his estates. I'm using it for non-commercial purposes only and I only made one. Note to Haring lawyers: Please don't sue me.

2. In Photoshop, I got rid of the colors, leaving only a dark line drawing. I printed it out and played with the sizing until I got to about a 5"x2" figure.

3. At the local hardware store (not named Lowe's or Home Depot), I got a little piece of scrap wood, about 5"x7" and an 1.5" in thickness, and a sponge block sandpaper, little package of brushes, 2 types of wood stains.

4. I placed the paper drawing over on the wood and using a dull pencil, traced/scored the design onto the wood. Then I penciled it in darker on the wood.

5. Using a jigsaw (in case you don't know, it looks like these), I cut the wood along the lines to get my mini-statue figure. For the gap between man and child, I drilled a small hole to get the jigsaw in there. Extra: I added a Chinese character for "5" on the man's chest.

6. I fine-tuned it with a smaller jigsaw bit, then sanded it down.

7. I stained top (baby) with a light stain (two coats), then stained the rest with a darker color (two coats).

What it cost
  • Wood $1.75
  • Brushes $3
  • Stains $10 ($5 each)
  • Sandpaper $2
  • Jigsaw $0 (borrowed)
  • Time (not counting two days for drying between applications of stains): 3 hours.
For a grand total of: $16.75

Do try this at home. Just remember: Safety, safety, safety. Make sure it's for non-commerial purposes only. Haring has alot of simple, child-like and timeless art. But it doesn't have to be Haring. I might try a Modigliani or a Matisse next.

Note: This is another post that first appeared on My Search for Meaning, Money...

3 Cool Photoshop Projects for New Dads

Note: This post originally appeared on my other blog, My Search for Meaning, Money... I'm in the process of moving all the arts & crafts posts over to this one.

As a new Dad, you're going to be taking a lot of pictures. You could play around with Photoshop's filters and effects. I did that but I found them unsatisfying because:
  • too easy, too quick.
  • anyone can do it, and they can see how you did it. So it's not very impressive.
  • maybe because so little effort is involved, there is a lack of heart or soul in the final image.
The following three projects will take a little time and effort (not a alot). And they are not too difficult. So if you're ready to turn your ordinary photos into eye-poppin' works of art, follow me.

1. Turn your picture into a comic.

Where I got the idea: There is a software app, Comic Life (for Mac only, I believe), that does it for you. But I used a free tutorial, I found here. It took a couple of tries to follow all the instructions. You can see the result above: a comic postcard of my daughter, lounging on the couch, watching Sesame Street on TV.

2. Composites

There is that Michael Keaton movie, Multipicity, where he clones himself many times. You're going to do the same, except in 2-D computer screen.

Where I Got the Idea: On Flickr, Donald Andrew Agarrat's Composites 2004, first inspired me to do my own. He gave a very basic tutorial (use tripod, layer mask, small brush tool for details), which was enough for me. There's even a whole Flickr group just on Composites (that also has cool collages) with a forum and tutorials.
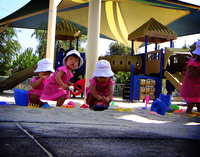


Here's my little girl playing in the sandbox at the park.


3. Favorite Toy Goes in the Picture

Once you've mastered the Composite technique, you're ready for next level of photo manipulation -- putting your child or child's favorite toy into the action.

Where I got the idea: my little girl loves reading Curious George Rides A Bike, and her favorite stuffed animal, Monkey Pie, looks a little bit like George. So...
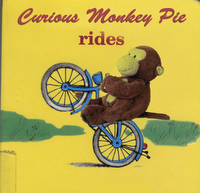


Now I know what you're thinking: Between changing diapers and work and not getting any sleep, how did you ever find the time for Photoshop? Hey, my wife asks the same thing. I do remember the NBA Playoffs were over and the NFL season had not started yet, so what is a guy to do?

Happy photo-doctoring!